This Is Not (Exclusively) What I’ve Been Doing


It's not as strong as it looks. I (hic!) promise.


I know it doesn’t look too good–I take an extended absence from blogging and my first post upon returning is a cocktail. But I haven’t been on a week-long bender, honest (at least not lately). I have two valid and related reasons to explain my recent disappearance: I was going out for the local roller derby league, and then I broke my wrist. Yeah, I know–you don’t have to say it.

So between the obsessive practicing of my T-stops and, now, the pain, both cooking and blogging about cooking have gotten pushed down my priority list. Luckily for y’all, I had this little number tucked away in reserve. I only hope that I’m not too late for you to make such delicious and alcoholic use of the last-of-season tomatoes.

I love bloody Marys, but sometimes they can be a little–well, thick. Gloppy, even. This lovely version solves that problem, while saving all of the flavor and essence of a good tomato-based cocktail. Tomato water is not only sophisticated and impressive, but astonishingly easy to make; in fact, “make” implies rather more active work than tomato water requires.

Tomato-Water Bloody Mary

Take a good quantity of good-quality tomatoes. Stem them and chop them roughly. Place in a colander set over a large mixing bowl, and let stand for several hours. Remove tomato pulp from colander and set aside for another use (I like to freeze this, and add it to stews, soups, chilis and tomato sauces later).  If desired, strain tomato water with a fine-mesh strainer.

In a tall glass, mix 1 oz. vodka, a few shakes Worcestershire, the juice of half a lime, a tsp. of horseradish and hot sauce or Sriracha to taste. Add tomato water and ice cubes. Stir. Garnish with green olives, pickle spears, Slim Jims, cherry tomatoes, cocktail shrimp, lime slice or all of the above. Enjoy!

Nick’s No Compromise Pancakes

Look at that perfect freakin' pat of butter

Funny thing about pancakes: I never liked them until I was pregnant with my son, and then suddenly I was having inexplicable cravings for them. My baby daddy (you might know him better as Long Suffering Husband, since I finally roped him into marrying me after two pregnancies) would take me out to Perkins, Denny’s, et. al., and I would order an omelet and hash browns and side of bacon and pancakes. And eat it all.

Ahem.

Anyway, ever since then I have loved pancakes, and my kids love them too. Fortunately, I can stick any old healthy vegetable or fruit into a pancake, and as long as there’s maple syrup, my kids will gobble it down. I’ve experimented a lot with pancakes, and I’m here to tell you that really, as long as you get them roughly the right consistency, you have a lot of pancake leeway. Take today, for example: we are out of whole-wheat flour, so I decided to grind up some oats. We had some leftover sweet potato (sheesh, I initially spelled that the Quayle way: potatoe) so I threw that in. Etc., etc. I’ve even made pancakes with beets, and believe it or not, passed them off as “Pink Princess Pancakes” or some such nonsense.

Motherhood–it’s 90 percent marketing.

Miss Four pronounced these “super good” and two thumbs up. She ate three, Mr. Seven ate two, LSH ate four or five or nine and even said “Mea culpa” because he had pooh-poohed my healthified flapjacks. Oh, and I ate a few too.

Nick’s No Compromise Healthy Delicious Pancakes

1 cup oat flour (pulse rolled oats in food processor or blender till it’s flour)
1 cup whole-wheat or all-purpose flour
2 tsp. baking powder
½ tsp. baking soda
1 tsp. salt
¼ cup wheat germ
¼ cup flaxmeal
½ tsp. cinnamon (optional)

2 cups almond, soy or cow milk
1 cup mashed sweet potato or winter squash
3 eggs
2 tbsp. butter or mild oil
1 tsp vanilla

Mix all of the dry ingredients together in a large bowl or, ideally, one of those nifty batter bowl thingamobs.

Mix together all of the wet ingredients, including squash, in a blender. Pour into the dry ingredients and mix thoroughly.

Here’s the tricky part: adjust the batter to make it pancakey. Too thick? Add some milk. Too thin? Add some flax meal, wheat germ or flour.

Fry them on a griddle. You know, like pancakes. If you don’t know how to make pancakes, go either to someone else’s blog, or back to 7th grade Home Economics.

Enjoy!

My Love Affair with Bacon. Part deux

Here she is, all rubbed down with maple syrup and brown sugar and salt and pepper. Mmmm, sweet and salty rub downs...

So as this year’s Nickmas festivities drew nigh, and my dance card became far too full for me to even think about hosting my own party, let alone another decadent ride on the Crazy Carnival of All Things Bacon, I decide to keep it simple. To go back to the land, as it were. So I went out to the barnyard in my old overalls, my “slaughteralls,” as I like to call ’em, and I said, “Sooooey!” and I butchered me a pig.

No, I didn’t. I just went to the Asian market and bought a nice pork belly, bone-in. I removed the rib section and tucked it in the freezer against the next time Long Suffering Husband has a hankerin’ for something meaty, took the rest of the belly, and plopped her skin-side down in a shallow casserole dish. I slathered her up with salt, brown sugar, pepper and a splash from the maple syrup bottle. (Don’t ask me why I keep calling the pork belly a “she”–I’ve no idea.) I massaged the spices into her tender flesh — OK, this is just wrong. At any rate, you know what to do. Smoosh everything in as best you can. cover it with saran wrap or–as the British say, “clingfilm,” marvelous word, that–and stick it in the fridge. For a couple of days. Each day you should take her out and admire her take it out and drain off any accumulated liquid. Re-clingfilm and return to fridge.

When you are ready to actually make the bacon, then it’s time to realize that you are not, in fact, ready to make bacon. First you have to smoke it, if you have a smoker, which we don’t (yet — hear that, LSH?) or bake it in the oven. Because I knew I’d be baking, I also added a liberal dose of liquid smoke to my pre-baked bacon. Then I wrapped her lovingly in a double layer of foil, put her in heavy, lidded pan, and let her bask away in a relaxing sauna/steam room let it bake, covered, in a slow oven  (about 250° F) for several hours.
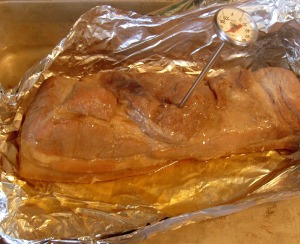
Trusty meat thermometer should tell you 160°

When you have removed the bacon from the foil packet, it will look roughly like this. You’ll now want to turn it over and remove the outer layer of fat; this should separate easily from the rest of it (unlike my outer layer of fat, which stays stubbornly attached to the rest of me), and then slice it, as thinly as you can. I suppose if you had access to a meat slicer, that would be the ideal tool. I just used a knife, though, and called it “thick-cut.” It’s alll about the marketing, you know.

Thick-cut bacon -- it's what's for breakfast

And then, like the good little feminist I am, I fried that bacon up in mah pan! Protip: if you start the bacon in a cold pan–and I’m sorry, but you must use a heavy cast-iron pan to fry bacon in (and chicken, but that’s another post). If you are still using that dreadful T-fal nonsense, then I’m going to have to come over to your house with my cast-iron skillet.

And beat you over the head with it.
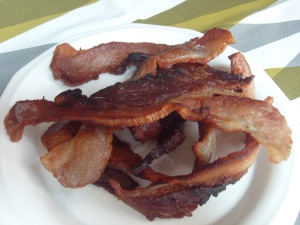
Behold...BACON!

Voila! Looks like bacon, doesn’t it? Remarkable. It tasted good, too — chewy in some places, crisp in others, the whole offering up just a hint of sweetness from the cure. We gobbled down most of it that day, grabbing a piece or two as we passed through the kitchen, but I did manage to save enough to make Hot-Plate Carbonara on vacation a few days later, but you’ll hear about that soon enough.

In the meantime, go get yourself a $4 pork belly at the Asian market–you can get them boneless, too–and get curin’. Although bacon takes some planning–mine cured for four or five days, I think, although you could get away with three–it’s remarkable easy and mostly hands-off.

I bet it would make a killer BLT, too.

Abba :: Sweden as Eggs :: Chickens

Fresh from the chickens' butts!

Much in the same way that I loved Abba even before I moved to Sweden, I loved eggs way before having chickens. I like ’em scrambled, fried, poached, coddled, mollycoddled and made into omelettes, particularly with cheddar cheese and artichoke hearts. In fact, if the house were afire, one of the things I would grab (after the children, the cats, the quote books, my old photos and some of the more expensive skeins of yarn in my stash, plus my Addi Turbo circular needles) would be my All-Clad omelette pan. Oh! and my Le Creuset. Well, actually the first thing to grab should be a wheelbarrow…but I digress.

Another way I love to prepare eggs is in quiches, frittatas and stratas. I free form these. A few eggs, whatever veg I have one hand, some potatoes if I got ’em, a crust if I feel like it. And cheese, of course — ricotta or cottage blended with the egg and veg mixture, then mozzarella or parmesan or cheddar or jack scattered on top. If I have appropriate fresh herbs, in they go too. Salt, pepper. I eyeball the mixture, choose a pan, plop it in. After a trip back in time, thanks to the magic of the Barstow, I get something that looks like this:

Ain't she a beauty?

This is a swiss chard and mushroom quiche, with a cracker-crumb crust. The original recipe calls for panko crumbs to be mixed right in, but since I coincidentally (or maybe not? hmm, fate?) had a box of crackers in which most of the bottom third had already crumbified themselves, thought I would use those instead. Plus, they were “Multigrain & Seed,” which sounds healthy. It’s probably the least healthy, locavorish ingredient in the whole thing, given that the chard was from our CSA and the eggs were from our chickens. But damn, they tasted good!

Chard and Mushroom Quiche

Adapted from the Swiss Chard and Mushroom Squares over at Kalyn’s Kitchen

1 bunch swiss chard, leaves separated from stems
1/2 lb mushrooms, preferably cremini, sliced
1 T olive oil (or a little more, depending on your pan)
1 c. cottage or ricotta cheese
1 cup grated mozzarella cheese
4 eggs, beaten
small amount Archer Farms Multigrain & Seed Snack Crackers®, crumbified
seasoning of your choice. I used onion and garlic powder because I was feeling lazy, salt, pepper and some hot red pepper flakes

Chop both chard stems and leaves, separately. In a medium saute pan, heat olive oil and add the chard stems. Salt. Cook these over medium-high heat, stirring, until they are browned and mostly tender. Add the chard leaves and the mushrooms. Cook, stirring, until the mushrooms are tender, or close to it. Remove from heat and let cool.

Meanwhile, in a large mixing bowl, combine beaten eggs, cottage cheese, and about half the mozzarella. Season. Combine the vegetables with the egg mixture.

Lightly grease a large pie pan or square baking pan. Dust with cracker crumbs. Spoon egg mixture over the crumbs. Bake at 400° for 30-40 minutes or until the top is nicely browned and the whole quiche feels set, not goopy or wobbly when you shake the pan gently. Unless you are absolutely ravenous, let this sit for at least an hour. Trust me. It will taste so much better if it’s not piping hot out of the oven. Plus, being patient lowers your risk of debilitating mouth-roof burns.

"Quiche Piece" sounds like naughty slang, doesn't it? "Imma go get me some of that tasty quiche piece tonight..."

Enjoy!

Create a free website or blog at WordPress.com.